Printing HTML from Android via ZPL

My main professional activity is developing an Android app nowadays (and before that it was developing iOS apps) but that’s not a very exciting topic as you can find gazillions of guides on it on the web and most of the time it’s just… normal programming.
But every now and then I have to develop something rather obscure, like a server application based on the outdated SOAP protocol (in this year of 2020), or in this case, printing warehouse/product/shipping barcode labels from an Android app.
Printing is so easy on Android! … Right?
When I first looked into how to support printing from my app, considering that we want our customers to be able to define their own label designs, I thought hey, why not just let people import HTML files into the app, then use Android’s WebView to print it. Super easy to implement, super easy to design labels.
I defined a bunch of special placeholder values that one can insert in the HTML (like for product code, product name, etc.), which the app then simply regex-replaces with the actual data to be printed. For barcodes, we use the ZXing library to generate the image and then stuff it into the HTML as an <img> tag with base64 data. I won’t get into the details of this whole process. It was a bit interesting, but not enough to warrant a blog entry.
Anyhow, soon enough the app was able to print labels with product barcodes and whatnot, designed in HTML. At least, it worked on regular everyday-use and office printers…
It comes out that your average industrial label printer is not exactly like a regular printer. (Props on me for not seeing that coming.) You’re lucky if your Android device will discover the printer in your LAN at all. You might be able to find some Android print service (think of it like a driver) which allows your device to discover or add the printer, but these services can be of very questionable quality. For instance, Zebra and Godex don’t offer any at all, and TSC only offers an incredibly crappy app which doesn’t even let you print multiple copies of a label. Amazingly, there’s a little open-source Android app called Zebra Print Service which mostly seems to work fine for Zebra devices, but it’s not without issues either…
And there’s another problem. On Android, if you’re going to print something via the standard printing APIs, there’s ABSOLUTELY no way to skip the preview screen for the document to be printed. (By the time I’m writing this we’re on Android 10 and this is the case.) This means that if you want to print 10 different documents in a row, your app’s user will have to wait a little for the fancy print preview to load (up to 1-2 seconds), so that she/he can then print that one document, then repeat this for 10 documents. The only way around this would have been to create composite HTML files that contains all the documents (labels) to be printed, one page each. I didn’t try that approach, so I can’t report on its viability.
OK, I’ll just do it myself then
Given those issues, and being informed by a tech-savvy customer that their choice of printer actually has an Android SDK available, I decided to check whether I could implement direct communication with one or a few printer models/brands, completely bypassing Android’s printing system.
After a bit of research I found out that there’s actually an industry de facto standard for communicating with label printers. The Zebra Programming Language (ZPL), initially developed by Zebra, is apparently supported very widely. No need for an Android SDK, just connect to TCP port 9100 of the printer in your LAN and send it ZPL commands, easy!
Well, not so easy. First of all, ZPL is basically its own label definition language, but not very friendly for non-programmers. I’ll probably eventually support importing ZPL files into the Android app, but we decided to use HTML, remember? It would be amazing if we could keep that convenience. And well, ZPL supports printing bitmaps… Hmm…
HTML to Bitmap via WebView
So our first challenge is to turn HTML into a bitmap. Obviously we’re not gonna implement our own rendering engine, so WebView it is, but how can you extract a bitmap from a WebView?
You can Google that question and find a few different answers, but most of them seem to assume that your WebView is already visible and rendered on the screen. We’d like to avoid that. After hours of trial and error, I figured out the following formula:
- Call
WebView.enableSlowWholeDocumentDraw()to disable an optimization which skips rendering unseen portions of the HTML. - Create your WebView normally, passing only a Context to its constructor.
- Call
myWebView.layout(0, 0, 1, 1)on it. If you don’t do this, the WebView will produce weird results when measuring the size of its contents. - Set a WebViewClient on your WebView, then tell the WebView to load the HTML.
- In the
onPageFinishedmethod of your WebViewClient… wait 100ms before continuing. Yeah, seriously. I tested whether posting a Runnable to the main thread’s Looper is enough, but it wasn’t. So just register a Runnable to be called after 100ms. (I haven’t tested any shorter values, but 100ms is short enough. I just hope it will work on a wide variety of devices, as we’re definitely in race condition territory here.) - Call
myWebView.measure(0, 0)to tell it to measure its contents now. Subsequently, you can get the correct width and height for the bitmap viamyWebView.getMeasuredWidth()andmyWebView.getMeasuredHeight(). - Create an
ARGB_8888Bitmap of the measured width and height, then callmyWebView.draw(new Canvas(myBitmap))to render the HTML into it.
Cool, we just rendered HTML into a Bitmap, and it wasn’t complicated at all or anything! But we’re not done yet either…
By the way, we will ultimately print in monochrome, but by the time I’m writing this there are no monochrome Bitmaps in Android, which is why we’re using ARGB for now.
Getting the DPI right
If we’re going to print, we must be able to control the physical dimensions of the HTML we used. You can indeed use millimeters in CSS, but to ensure that 1mm in the HTML actually becomes 1mm on paper, we have to make sure that our WebView renders the HTML with the same DPI value as that of our printer. For instance, if our printer will represent 1mm as 20 dots, then the WebView should render 1mm as 20 “pixels” in the Bitmap. (I’m putting pixel in quotes because we’re talking about virtual pixels here, which is also why I’ll stick to the term DPI rather than PPI.)
Alternatively, we can scale the Bitmap to reach the correct DPI if we know the original DPI it was rendered with. I couldn’t find a way to tell a WebView to render with a given DPI, but did find a way to figure out the DPI it renders with, so I decided to go the scaling route.
It wasn’t that easy figuring out what DPI the WebView uses, but ultimately a Google Chrome developer guide for creating pixel-perfect UIs gave me the answer. The “standard” DPI of WebView is 96, which on Android is then multiplied with the display metrics property called “density.” So given a Context object “c” in your code, use this formula:
96 * c.getResources().getDisplayMetrics().density
OK, we got the source DPI, but what’s our target DPI? Thankfully, label printers all support the de facto standard of 203 dpi, which corresponds almost exactly to 8 dots per millimeter, meaning you can represent a 1mm-wide (and one dot-high) line on paper as one byte. (We’re talking monochrome here, so 1 dot = 1 bit.) That happens to be exactly how printing bitmaps works in ZPL. Given that 8 horizontal dots are represented as 1 byte, we not only want to scale our Bitmap to the correct DPI, but also ensure that its width is a multiple of 8. Hence the following formula:
double targetDpi = 203;
double scale = targetDpi / sourceDpi;
double scaledWidth = Math.round(width * scale);
double scaledHeight = Math.round(height * scale);
int targetWidth = ((int) (scaledWidth + 7)) / 8 * 8;
int targetHeight = (int) scaledHeight;
I don’t know if Math.round() is really the best option there. Maybe it should be Math.ceil() but it’s probably not so important. Given the target dimensions, you can use Bitmap.createScaledBitmap() to get a scaled Bitmap. (I think it’s best to set the last argument, i.e. filter, to true.)
Phew! We’re really done creating a suitable Bitmap now, although next is the challenge of transforming it into a ZPL bitmap, which as mentioned before uses one byte to represent 8 horizontal dots on paper. (In other words, it’s actually a real bitmap, unlike the Bitmap class in Android which actually represents a pix-map.)
ARGB Bitmap to ZPL bitmap
There’s several ways to do this, and it can get quite complicated.
Remember that we want one byte for 8 dots, so we want to iterate over the width of the Bitmap in steps of 8. Then within that iteration, we iterate from 1 to 8, check if the pixel on our position should be black or white, and set the corresponding bit of of the byte we’re constructing.
To determine whether an RGB pixel should be black or white, its best to calculate its relative luminance
and see if its above or below 50% of the maximum value. The typical RGB
to luminance formula gives values between 0 and 255, so we’ll check if
it’s 0 to 127 or 128 to 255. For getting the R, G and B components of a
Color int in Android, we can use bit shifts and masks. On newer Android
versions there’s also static methods like Color.red() which probably produce identical results, though their implementation does something else so I’m not sure.
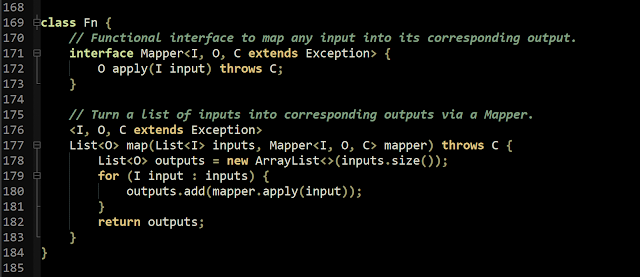
Anyhow, so here’s the code:
for (int y = 0; y < height; ++y) {
    for (int x = 0; x < width; x += 8) {
        byte mm = 0; // 8 horizontal dots
        for (int i = 0; i < 8; ++i) {
            int argb = bitmap.getPixel(x + i, y);
            int r = (argb >> 16) & 0xff;
            int g = (argb >>  8) & 0xff;
            int b = (argb      ) & 0xff;
            int lum = (int) (0.2126 * r + 0.7152 * g + 0.0722 * b);
            if (lum < 128) {
                mm += 1 << (7 - i);
            }
        }
        output.write(mm);
    }
}
(Here I write each computed byte into an object called output
but if you want to write it into a simple byte array I’m sure you can
figure out how to do that. Hint: don’t forget to divide x by 8.)
That’s nice and all but for a large bitmap, that will be a lot of calls to bitmap.getPixel()
which comes out to be a non-trivial operation. It would be great if we
could directly address the underlying pix-map. There doesn’t seem to be a
way to do that, but in the hopes that it still improves performance, I
decided to copy the pixels into an int array via Bitmap.getPixels() after which they can be addressed like pixels[y * width + x + i].
Some poor man’s benchmarking indicates that this speeds up things quite significantly, like from 1.8s down to 0.06s. In UI design there’s a “two second rule” that says things should on average take not much longer than two seconds to load. Given that we’re already losing some time rendering HTML via WebView, it’s a good thing we could bring down this portion of the code to a mere 60ms.
So… we done?
Hah, you wish! This last bit was incredibly frustrating to figure out. If I can even say I figured it out. For testing purposes I was using a Godex ZX420i printer, and I started encountering strange issues with it at some point. Frequently, upon receiving the ZPL commands I sent it from the Android device I was testing with, it would just hang up and not do anything until I turned it off and on again.
Remember the optimization above that speeds up the ZPL bitmap generation? It wasn’t the only one; another was to buffer the output instead of sending each calculated byte one by one over the TCP socket to the printer. At that point I was dealing with some other issues as well, like still trying to figure out the DPI problem, so my mind was all over the place, and the idea that buffering output to improve performance would somehow mess things up seemed unrealistic, so I didn’t make the connection.
I tested various things for hours. I made sure that the optimizations I used didn’t actually change the resulting byte stream sent over TCP. Indeed they didn’t, at least after fixing all the bugs. I sent the byte stream to my PC, then sent it to the printer from my PC, and couldn’t reproduce the issue that way. This also made me further NOT consider the connection between the buffering in my code and the problematic behavior of the printer. (After all, storing the data on my PC intermittently and then sending it in one chunk is also a kind of buffering.) I looked at TCP captures a bit with Wireshark, but am not very good at that so didn’t come far. I wondered whether I could capture the TCP connection between the Android device and the printer, since sending the data from my PC worked, but couldn’t find a quick way to do that and really didn’t feel like diving deep into the details of TCP, even with the friendly people of Freenode’s ##networking IRC channel being there to help me…
I even replicated the Android Java code in regular Java (using BufferedImage in place of Bitmap) which I ran on my PC with JDK 15, which also confirmed that the code was working fine. I further found out that using another Android device with a newer OS version resolved the issue. I thought, the TCP/IP stack on that Android device with which I was experiencing the problem must somehow be broken. But such a dire bug in such a central piece of the OS?.. OK, let’s try one more thing. Very early in the process, I had success using the Godex Android SDK, so I thought let’s give that a try again. And indeed, I was able to print bitmaps of any size without issues.
It’s a great thing that there is a thing such as a decompiler. A Java decompiler is built right into Android Studio so you don’t even have to do anything special, just open a JAR and read reconstructed Java code. After some inspection, I concluded that there were three main differences between my own code, and what the Godex SDK uses to send a bitmap:
- I use ZPL, the Godex SDK uses a Godex-specific language
- The Godex SDK adds some carriage returns and line feeds here and there
- The Godex SDK sets
SO_SNDBUFto 1024 on the TCP socket
I decided to first test whether number 2 was the issue, since it seemed more likely than number 3. (And testing number 1 is useless since if I’m going to use a Godex-specific language, why implement it myself and not just use the SDK.) But adding CR and LF characters at the exact same spots the Godex SDK would put them made no difference.
So… yeah, SO_SNDBUF. Or rather, in Java, Socket.setSendBufferSize().
Setting it to 1024, like the Godex SDK does, seems to resolve the
issue. Amazingly, this high-end industrial printer was apparently
choking when sent too much data at once, and I guess the TCP/IP
implementation on some versions of Android don’t deal with that
situation very well. So it was a buffering related issue, but only in
relation to a certain TCP/IP implementation…
I never, ever thought that in this year of 2020, almost 2021 in fact, I would encounter such a nasty issue with TCP. As a high-level application developer, I’m used to either having byte streams transferred without a problem, or having a clear error condition reported to me by the underlying system. Settings like TCP buffer size are just for obscure optimization edge cases as far as I’m concerned. The idea that I can write all my bytes into a TCP socket with no error, yet have the other end choke on the TCP segments despite the payload being perfectly well-formed, is just completely alien to me.
When I think about it, it almost gives me a feeling of dread, like I don’t even know what to trust anymore. What’s gonna happen next, the compiler producing broken results from perfectly well-formed code? Having my files corrupted when I transfer them over scp? *shudder*
But hey, at least I learned something new. And if you’ve actually read this blog post, then maybe you did too, and maybe you can teach it a few more people, so they won’t have to lose their minds like I did.
~~~ fin ~~~
Comments
Post a Comment